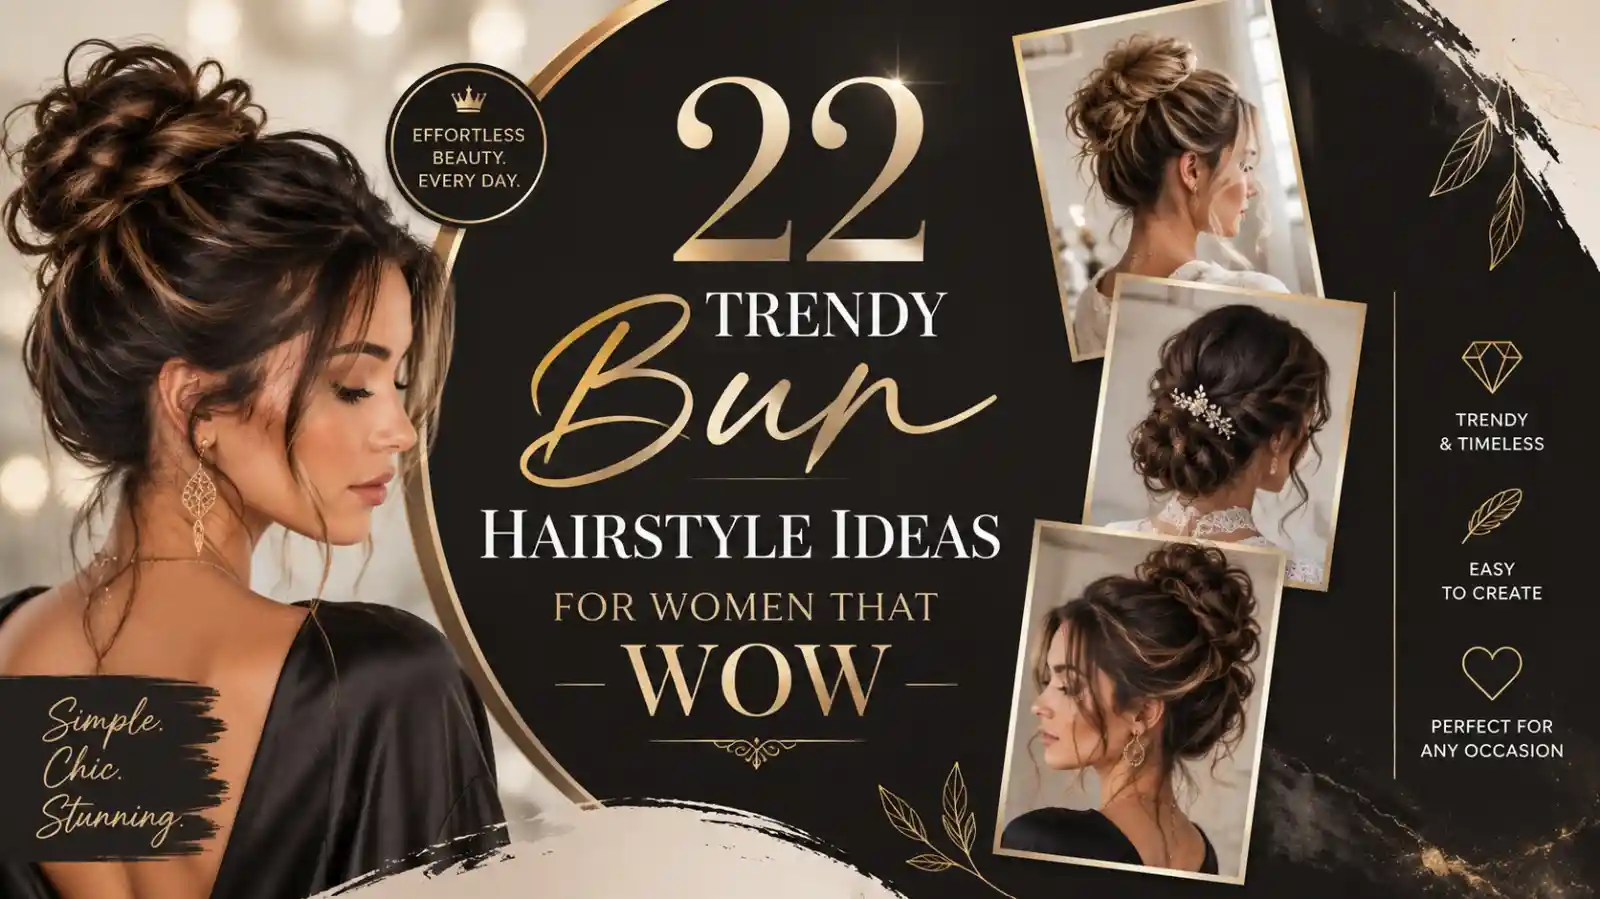
22 Trendy Bun Hairstyle Ideas for Women That Wow
Ready to make your everyday bun look anything but ordinary? These Bun Hairstyle ideas for women by Styled Aura bring fresh shapes, textures, and details to a timeless updo. Whether your hair feels difficult to manage, your usual bun looks too plain, or you simply want a new style to save on Pinterest, this collection has plenty of inspiration.
You’ll find sleek, braided, twisted, knotted, accessorized, and sculptural buns designed for different moods and occasions. Some are quick enough for everyday styling, while others add a polished touch for celebrations and special events. In my experience, changing the bun’s texture, placement, or one small detail can completely transform the finished look. Keep scrolling to find a style that feels perfect for you.
1. Sleek Low Bun
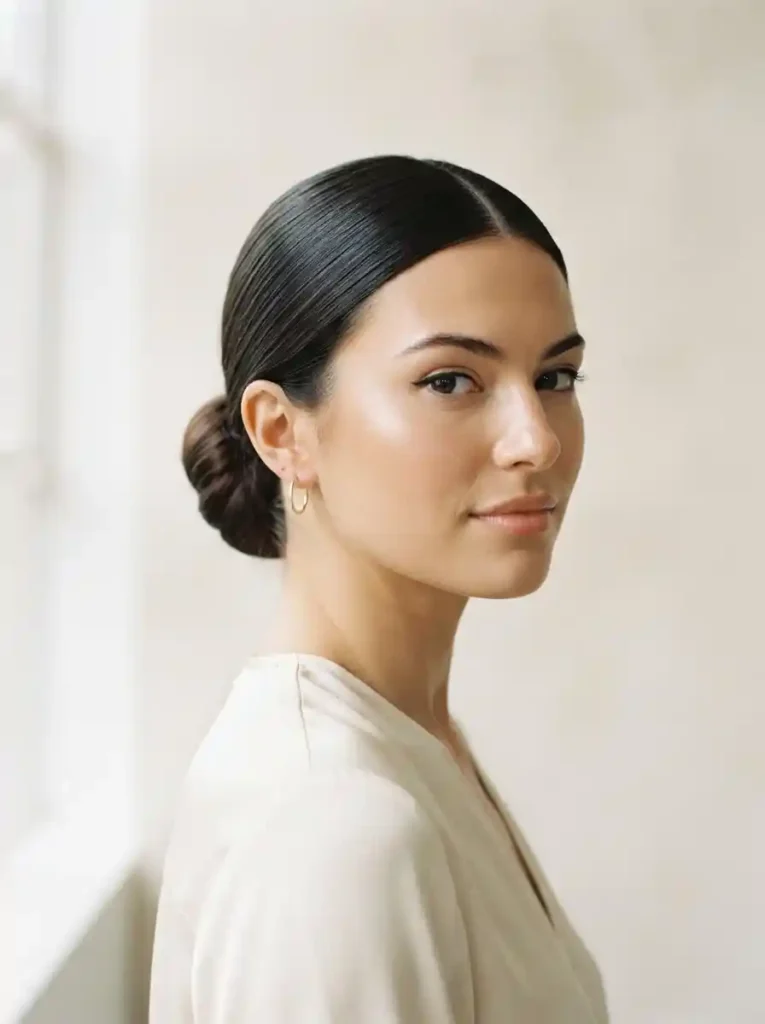
- Creates a polished shape with minimal effort.
- Keeps medium-to-long hair neatly controlled throughout the day.
- A center or side part changes the overall look instantly.
- Lightweight smoothing cream can help manage flyaways without making hair stiff.
A sleek low bun can instantly make your everyday look feel polished without requiring complicated styling. This smooth version works especially well for straight or gently wavy, medium-to-long hair because the clean shape keeps loose strands controlled and the finish looks refined. Start by brushing hair back, creating a neat center or side part, and securing a low ponytail near the nape. Twist the length into a compact bun and pin it firmly. In my experience, a tiny amount of lightweight smoothing cream helps tame flyaways while keeping the bun soft rather than stiff.
This low bun is a practical choice for school, work, dinners, or days when you want your hair neatly out of the way. Its understated shape also pairs easily with earrings, hair clips, scarves, or a simple outfit, making it surprisingly versatile. For a softer Pinterest-inspired finish, leave two very slim strands around the face before securing the bun, then lightly curl them if desired. The result is tidy without looking overly formal. It also works beautifully as a base for dressier styling, especially when you add delicate pins or a polished barrette above the bun.
2. Twisted Messy Bun
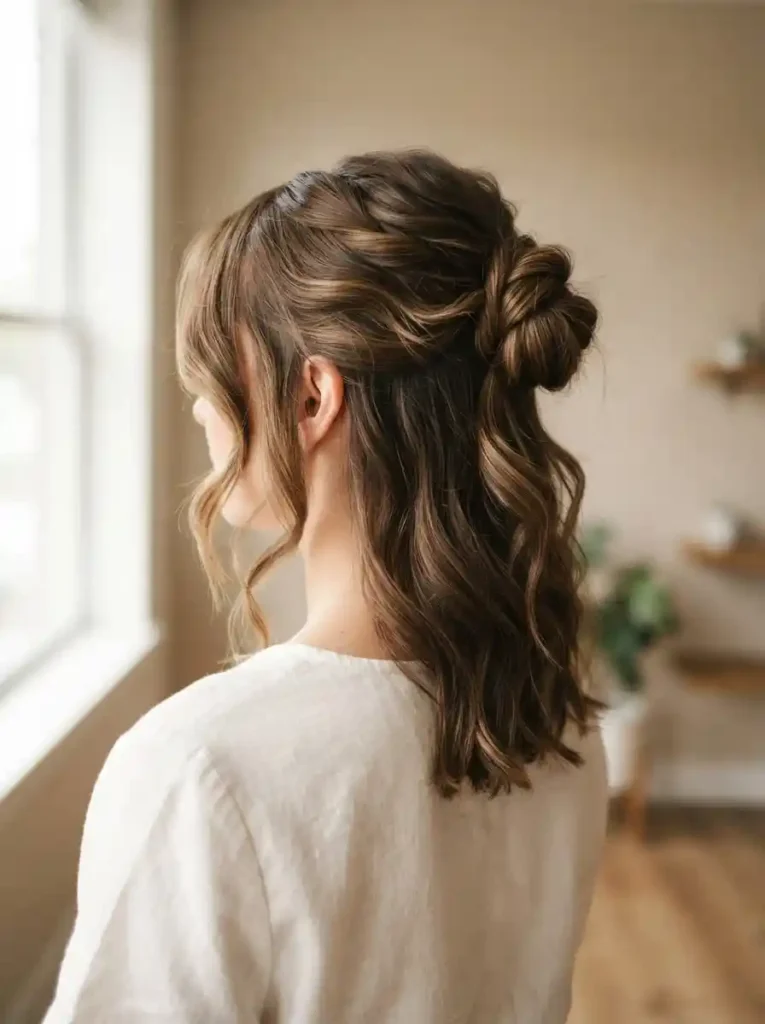
- Adds natural-looking texture and movement to an updo.
- Works especially well with wavy or lightly textured hair.
- A slightly expanded shape can make the bun look fuller.
- Texturizing spray helps the twists stay defined and easier to pin.
Bring a little texture into your updo with a loose twisted bun that looks effortless while staying secure. This style suits medium and long hair, particularly naturally wavy or lightly textured lengths that already have some movement. Gather the hair into a mid-height ponytail, divide it into two sections, twist them gently, and wrap the twists around the base. Pin the bun from several directions so it holds without feeling tight. I’ve noticed that gently pulling a few sections wider after pinning creates attractive dimension and prevents the finished style from looking too compact or rigid.
A relaxed twisted bun is ideal when you want an updo that feels comfortable for everyday plans but still looks intentionally styled. The added texture gives fine or flat-looking hair more visual movement, while the imperfect shape creates a soft, approachable finish. Try it for brunch, casual celebrations, weekend outings, or a simple date-night look with family or friends. If your hair tends to slip, work a little texturizing spray through the lengths before twisting. Finish with discreet bobby pins and a light mist of flexible hairspray so the style remains touchable while holding its shape.
3. Braided Crown Bun
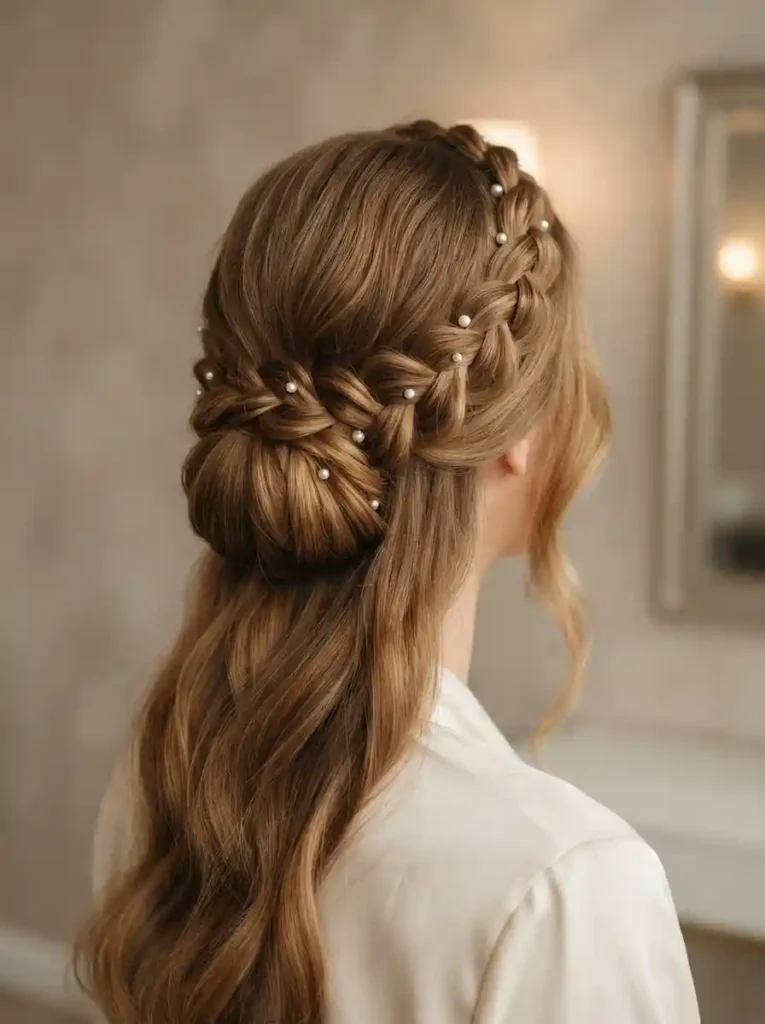
- Combines a neat bun with a decorative braided detail.
- Adds visual interest without relying on heavy accessories.
- Works beautifully for celebrations and semi-formal occasions.
- Hidden pins placed along the braid can improve stability.
For a hairstyle that feels romantic yet easy to manage, try a braided crown bun with the braid wrapped neatly around the base. This design works best on medium-to-long hair and adds detail without needing multiple accessories. Create a low ponytail, braid a small section from one side, then twist the remaining hair into a bun. Wrap the braid around the bun and secure it with hidden pins. Straight hair can be lightly waved beforehand for extra fullness, while naturally wavy hair can be styled with minimal preparation. That layered texture makes the finished look feel detailed from every angle.
A braided bun is especially useful when you want one hairstyle to look decorative without becoming difficult to wear. The braid adds a clear focal point, while the bun keeps the overall shape controlled and comfortable. It can suit daytime gatherings, school events, family celebrations, or semi-formal occasions when you want something more polished than a basic updo. For extra hold, many hairstylists recommend anchoring the braid at several points instead of relying on one pin. Add small pearl pins or a delicate clip if you want more detail, but the hairstyle already has plenty of visual interest.
4. Bubble Wrap Bun
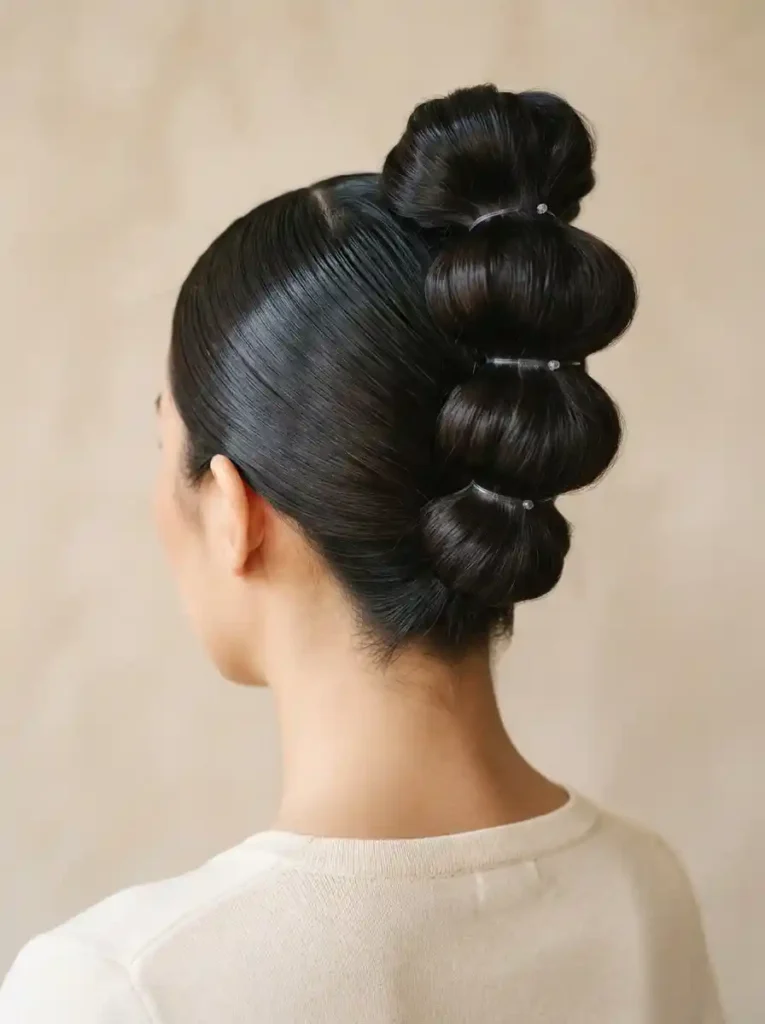
- Gives a classic bun an unexpected, sculptural finish.
- Best for long hair that has enough length to create sections.
- Small clear elastics keep each bubble defined and secure.
- A smooth crown balances the playful texture through the lengths.
Turn a simple updo into something unexpectedly eye-catching with a bubble wrap bun that gives long hair a sculptural finish. Instead of twisting the entire ponytail into one smooth coil, divide the length into several small sections and gently puff each section before wrapping them around the bun base. The rounded shapes create dimension while keeping the overall hairstyle secure. This idea works especially well on long, straight hair because the sections stay visually defined. In my experience, keeping the crown sleek while adding volume only through the bun creates a much cleaner and more intentional result.
This playful variation is perfect when you want your hairstyle to become the main detail of your outfit. It can work for parties, fashion-forward events, creative photos, or occasions where a traditional bun feels too predictable. Keep the elastics discreet so the rounded sections remain the focus, and use lightweight hairspray around the finished shape for control. If your hair is very fine, gently backcomb each section before wrapping it to create more body. The final silhouette feels modern and artistic while still being practical enough to keep longer hair neatly contained throughout your plans.
5. Loop Knot Bun
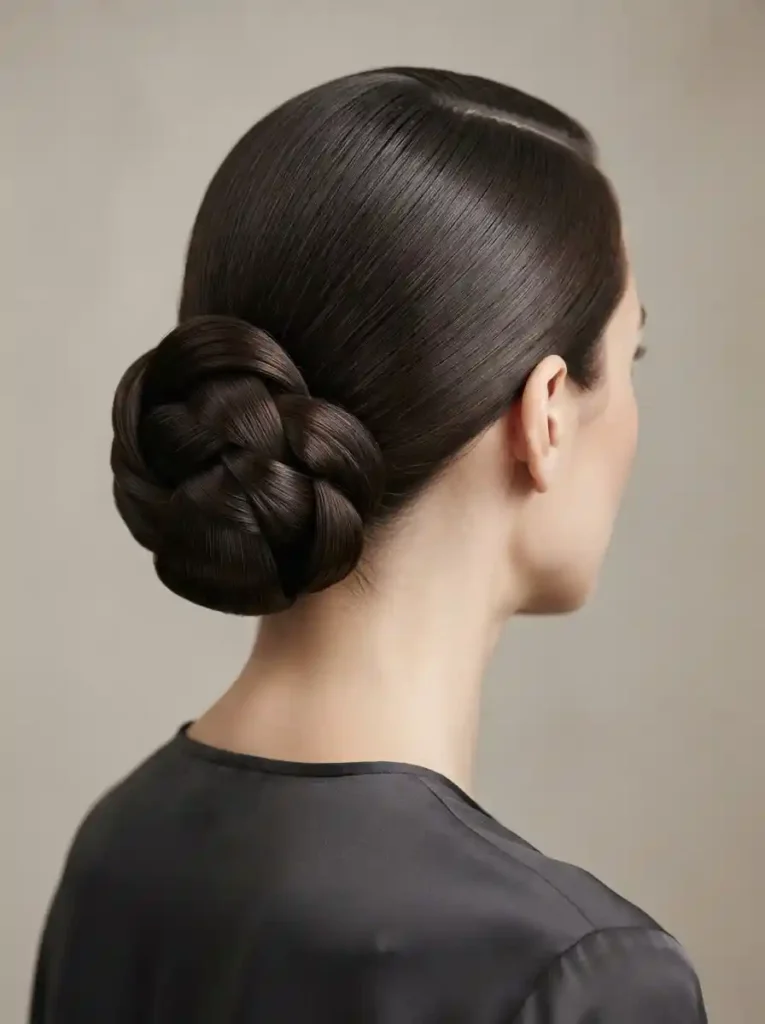
- Creates an architectural shape without complicated braiding.
- Looks especially striking with long, smooth hair.
- The looped sections add dimension to an otherwise simple updo.
- A strong elastic and strategically placed pins help maintain the shape.
Make your bun look more artistic with a loop knot design that turns the hair itself into the accessory. This style uses carefully folded sections instead of a traditional twist, creating overlapping loops around a secure base. It looks particularly striking on long, smooth hair because the clean strands reveal the shape clearly. Begin with a low ponytail, separate the length into sections, and fold each section into a loop before pinning it around the base. I’ve noticed that working with smaller sections gives better control and makes the final structure look more balanced from different viewing angles.
The loop knot bun is a smart option for occasions when you want sophistication without adding jewelry or elaborate accessories. Its structured silhouette suits dinners, celebrations, photographs, and polished daytime events, while the low placement keeps the style comfortable. For a softer interpretation, leave the front part slightly relaxed rather than pulling every strand tightly backward. A small amount of shine-enhancing product can make the loops look smoother under indoor lighting. Once finished, check the bun from the side and back, because adjusting one or two loops can dramatically improve symmetry and make the hairstyle appear professionally arranged.
6. Ribbon-Woven Bun
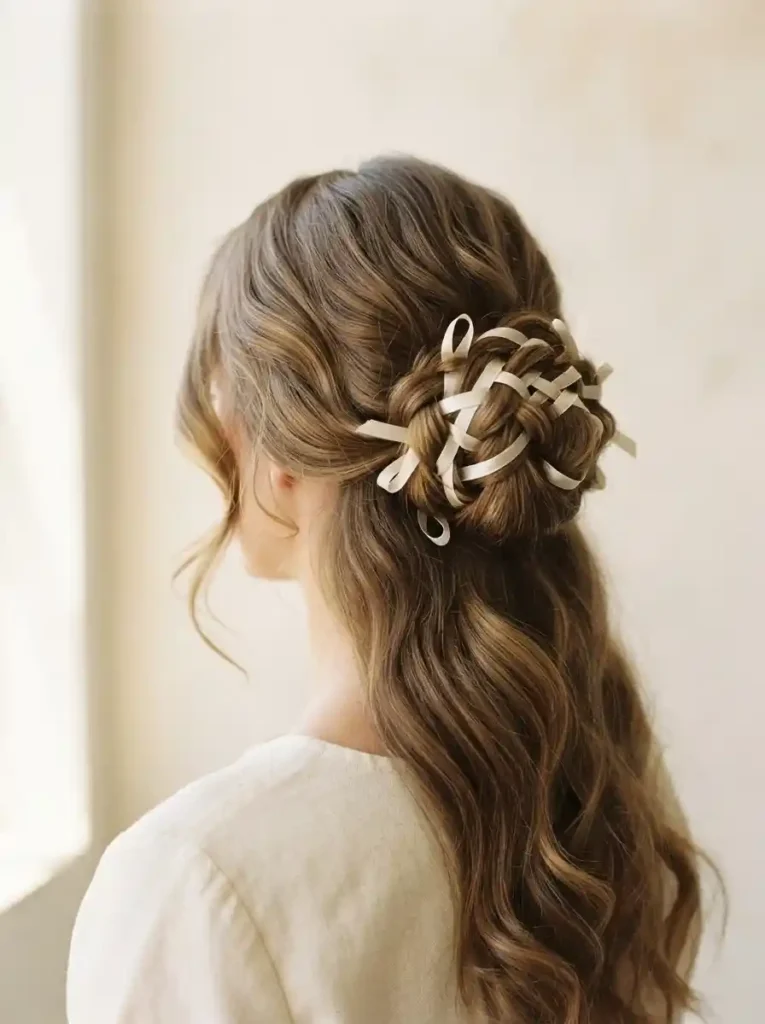
- Uses a ribbon to create a distinctive decorative pattern.
- Adds color and personality without changing the basic bun shape.
- Works with straight, wavy, or lightly curled hair.
- A narrow ribbon is easier to weave securely through the sections..
Add a fresh decorative twist to your updo with a ribbon-woven bun that blends hairstyling with a simple accessory. Start by creating a secure ponytail, then divide the length into sections and weave a narrow ribbon through them before wrapping everything into a bun. Satin, velvet, or grosgrain ribbon can create different textures without changing the basic technique. This style works on straight and wavy hair, although lightly textured lengths often hold the woven sections more easily. That’s why many hairstylists recommend choosing a ribbon that feels lightweight and flexible rather than one that makes the bun bulky.
A ribbon-woven bun can make an ordinary outfit feel more thoughtfully styled without requiring a complicated hair design. Choose a neutral ribbon for a subtle finish, or use a soft contrasting shade when you want the accessory to stand out in photographs. It works nicely for celebrations, picnics, birthday gatherings, school functions, and creative Pinterest-inspired looks. Keep the bun moderately loose so the ribbon remains visible instead of disappearing inside the hair. Secure the final wrap with discreet pins, then gently adjust the woven sections until the pattern looks even from the back and side.
7. Rose Coil Bun
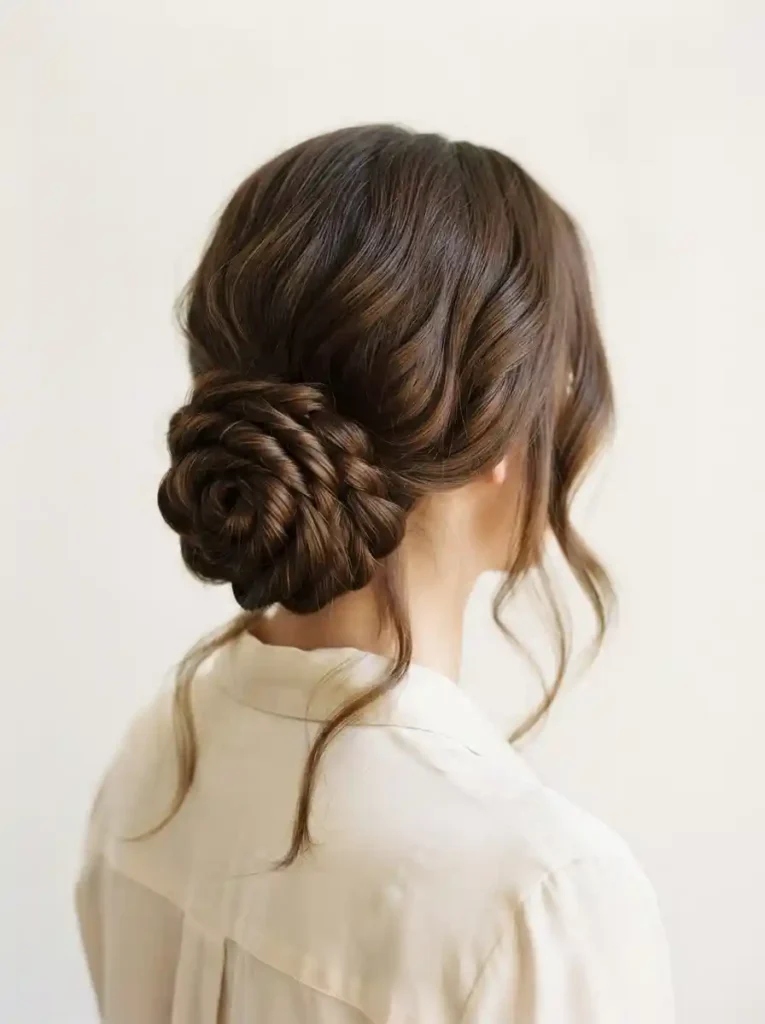
- Creates a flower-like shape using twisted hair sections.
- Adds dimension without needing decorative accessories.
- Works especially well with long, smooth or softly wavy hair.
- Wider coils create a softer, more visible petal effect.
Give a traditional updo a botanical-inspired shape with a rose coil bun that turns twisted sections into layered, petal-like curves. This style works particularly well with long hair because extra length allows you to build a fuller shape around the base. Create a low ponytail, divide the length into several sections, twist each one gently, and wrap them around the center in overlapping circles. Keep the twists relaxed rather than tightly pulled. In my experience, slightly wider coils create a softer floral appearance and make the individual layers easier to see in photographs.
The rose-inspired shape makes this bun especially appealing for weddings, celebrations, formal dinners, or polished portrait sessions. It can also be adapted for everyday wear by keeping the coils less structured and skipping additional accessories. If your hair is naturally straight and slippery, a little texturizing product can improve grip before twisting. For wavy hair, preserve some natural texture instead of smoothing everything completely. Once the bun is pinned, gently adjust the outer coils so they fan outward slightly. This creates a dimensional silhouette while keeping the center secure and the overall design comfortably wearable.
8. Double Knot Bun
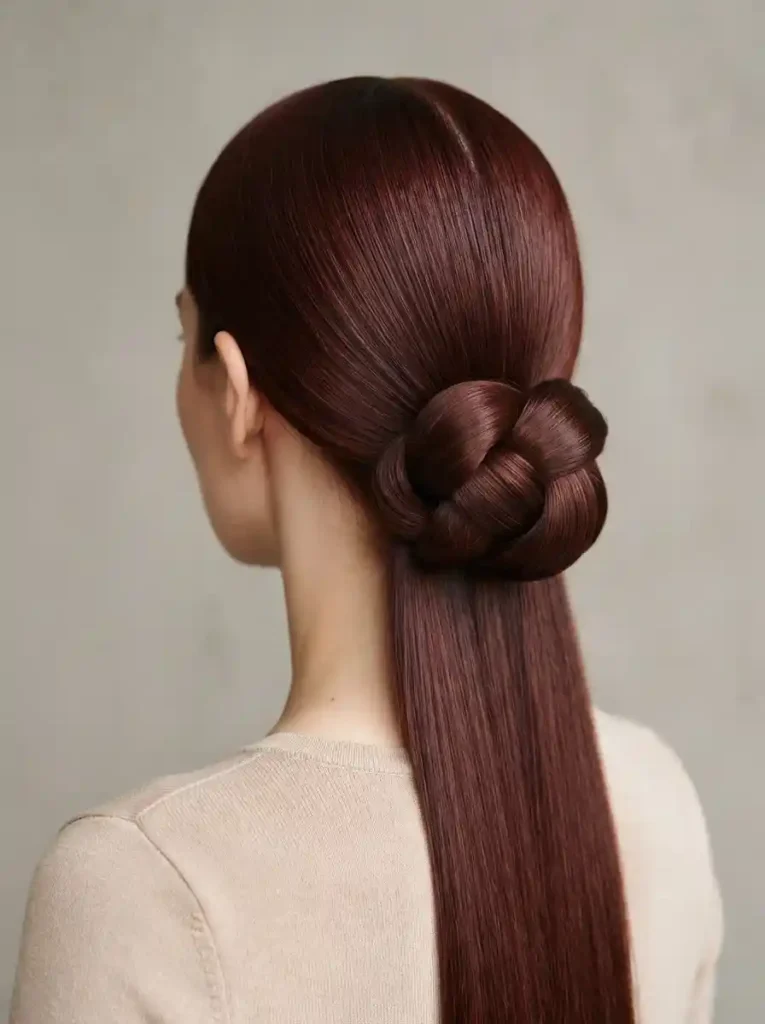
- Uses two visible knots to create a distinctive silhouette.
- Adds structure while remaining simpler than intricate braiding.
- Looks striking on medium-to-long hair.
- A sleek finish keeps the unusual shape looking intentional.
Try a double knot bun when you want a hairstyle that looks sophisticated but noticeably different from a standard twisted updo. Instead of wrapping the entire ponytail into one coil, divide the length and create two controlled knots that overlap at the nape. Secure each section carefully with hidden pins, keeping the surrounding hair smooth. This design suits medium-to-long hair and looks particularly clear on straight or lightly waved textures. I’ve seen this style work beautifully for many people because the symmetrical knots create visual interest while the low placement keeps the overall silhouette neat and balanced.
The double knot shape is versatile enough for polished daytime outfits, dinners, celebrations, and modern formal looks. Its structured appearance can make even a simple hairstyle feel deliberately designed, especially when paired with understated earrings or a clean neckline. For a softer finish, loosen a few strands around the temples instead of pulling the front completely flat. If your hair is thick, divide the ponytail into manageable sections before knotting so the shape does not become overly heavy. Finish with flexible hairspray and check the back from several angles to keep both knots evenly positioned.
9. Scarf-Wrapped Bun
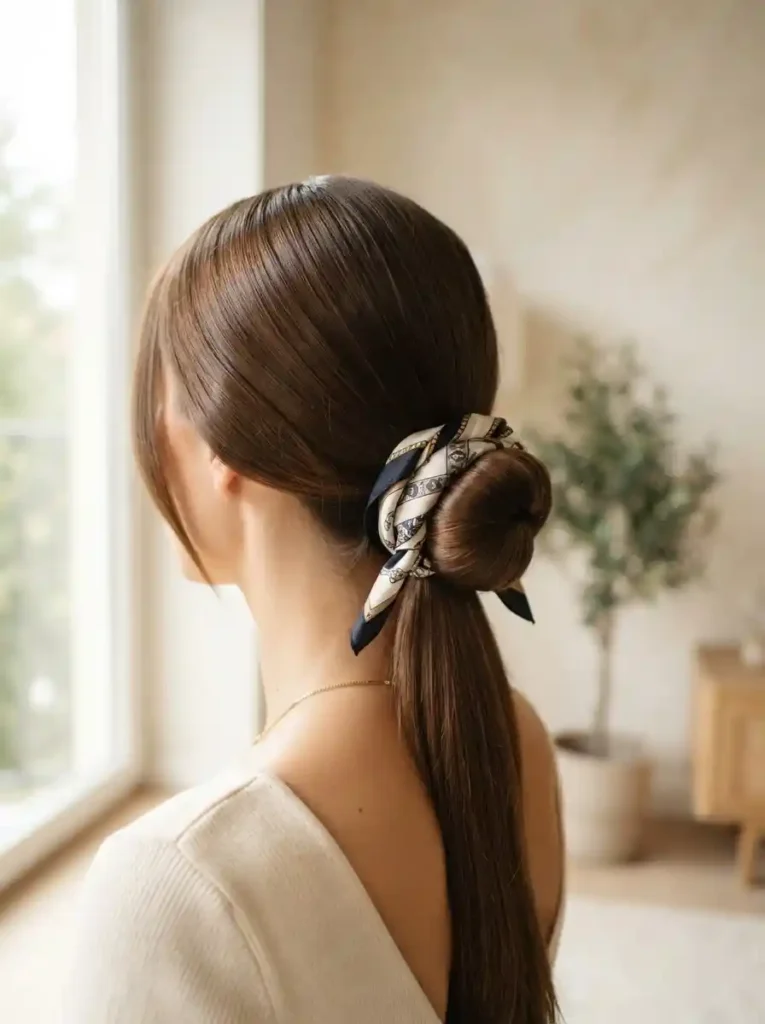
- Turns a simple bun into a colorful statement hairstyle.
- A scarf can add texture, pattern, and personality instantly.
- Works well with both casual and polished outfits.
- Lightweight scarves are easier to wrap and secure comfortably.
Transform a simple bun with a scarf-wrapped finish that instantly introduces color, pattern, and texture. Begin with a secure low or medium ponytail, fold the hair into a rounded bun, and wrap a lightweight scarf around the base before tying or tucking the ends neatly. This approach works across straight, wavy, and lightly textured hair because the accessory provides the visual detail. Choose a narrow silk scarf when you want a refined appearance or a softer fabric for a relaxed outfit. In my experience, keeping the scarf relatively slim prevents the finished bun from looking bulky or overwhelmed.
A scarf-wrapped bun is especially useful when your outfit needs one small statement detail without adding several accessories. Floral prints, geometric patterns, or simple solid shades can completely change the personality of the same hairstyle. Wear it for weekend outings, lunches, family gatherings, travel days, or casual celebrations where you want a polished but approachable look. Keep the front smooth or softly relaxed depending on your outfit, then position the scarf so its pattern remains visible from the back. Secure the wrap with discreet pins if necessary, especially when working with silky hair that tends to shift.
10. Braided Spiral Bun
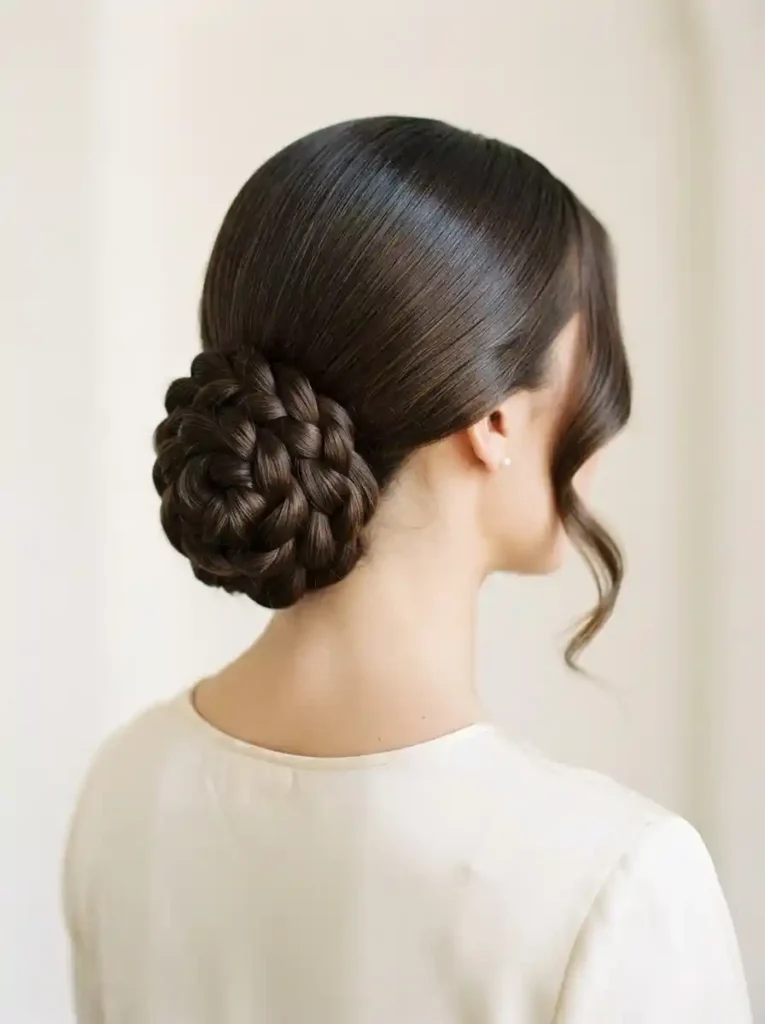
- Creates a visible spiral pattern instead of a basic wrapped bun.
- Adds texture and dimension to long hair.
- A tighter braid gives the spiral more definition.
- Works beautifully for events where the back of the hairstyle matters.
Turn a classic updo into a detailed spiral design with a braided spiral bun that draws attention from the back. Start with a secure ponytail and create one medium-width three-strand braid through the length. Wrap the braid around its base in a gradually widening spiral, then tuck and pin the end underneath. Long hair provides enough length to make the pattern clearly visible, while medium-density hair keeps the shape manageable. I’ve noticed that loosening the outer edge of the braid slightly can make the spiral look fuller without sacrificing its clean structure or secure hold.
This braided variation works beautifully when the back of your hairstyle deserves as much attention as the front. It suits celebrations, formal dinners, cultural events, and photographs where a detailed updo can become part of the overall look. Keep the crown smooth for contrast, or gently soften the front with a few loose strands. If your hair is layered, use small pins along the spiral to prevent shorter pieces from escaping. A flexible finishing spray can help maintain the braid’s definition while preserving some natural movement, giving the bun an elegant appearance without making it feel overly rigid.
11. Side-Swept Knot Bun
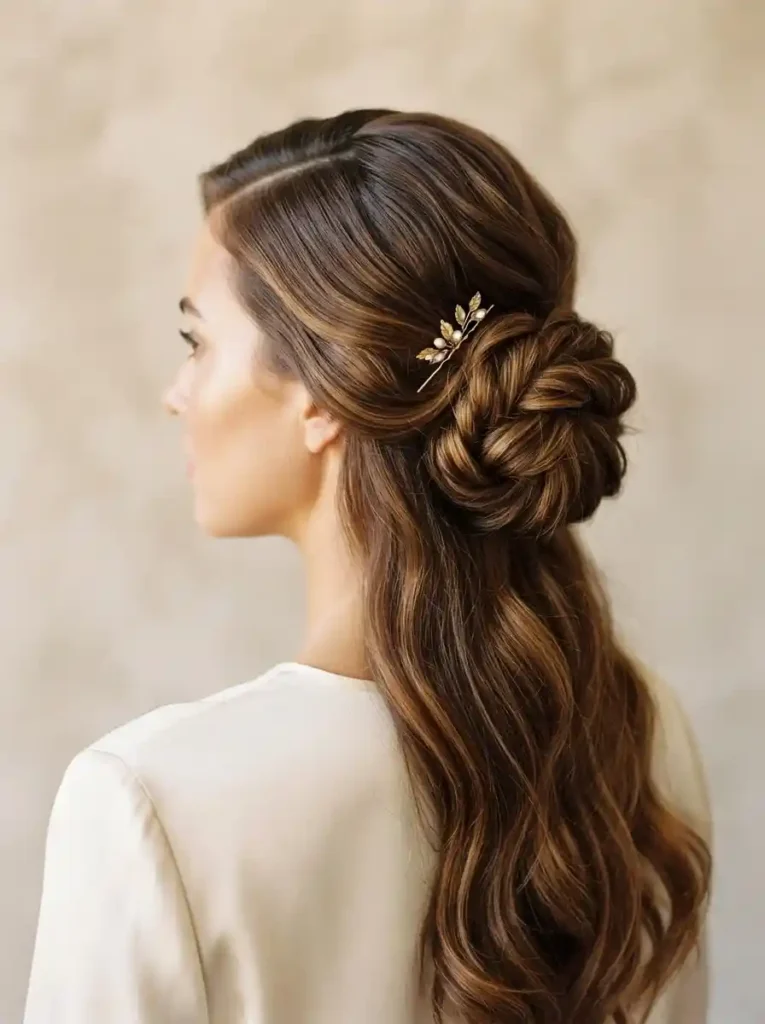
- Creates an asymmetrical silhouette with a softer visual balance.
- Moves the bun away from the center for a distinctive finish.
- Complements side parts and face-framing layers naturally.
- Works for both polished events and relaxed evening styling.
Shift the focus away from the center with a side-swept knot bun that gives an updo an elegant asymmetrical shape. Create a deep side part, sweep the larger section toward the back, and gather the hair slightly behind one ear before forming a soft knot. Secure the shape with pins placed underneath so the outer surface stays clean. This style works especially well with medium-to-long wavy hair because natural movement makes the side placement feel softer. In my experience, leaving the front slightly relaxed helps balance the structured knot and keeps the hairstyle from appearing too severe.
A side-positioned bun can change the entire impression of an outfit because the silhouette looks different from every angle. It is a lovely choice for dinners, celebrations, photographs, or occasions when you want an updo that feels graceful without being overly traditional. Add one understated hairpin near the knot for a refined finishing touch, or leave accessories out for a minimalist effect. If your hair is very straight, create gentle waves before styling to improve texture and grip. Keep the knot moderately loose, then secure it from underneath so the side-swept shape remains comfortable and naturally dimensional.
12. Bow Loop Bun
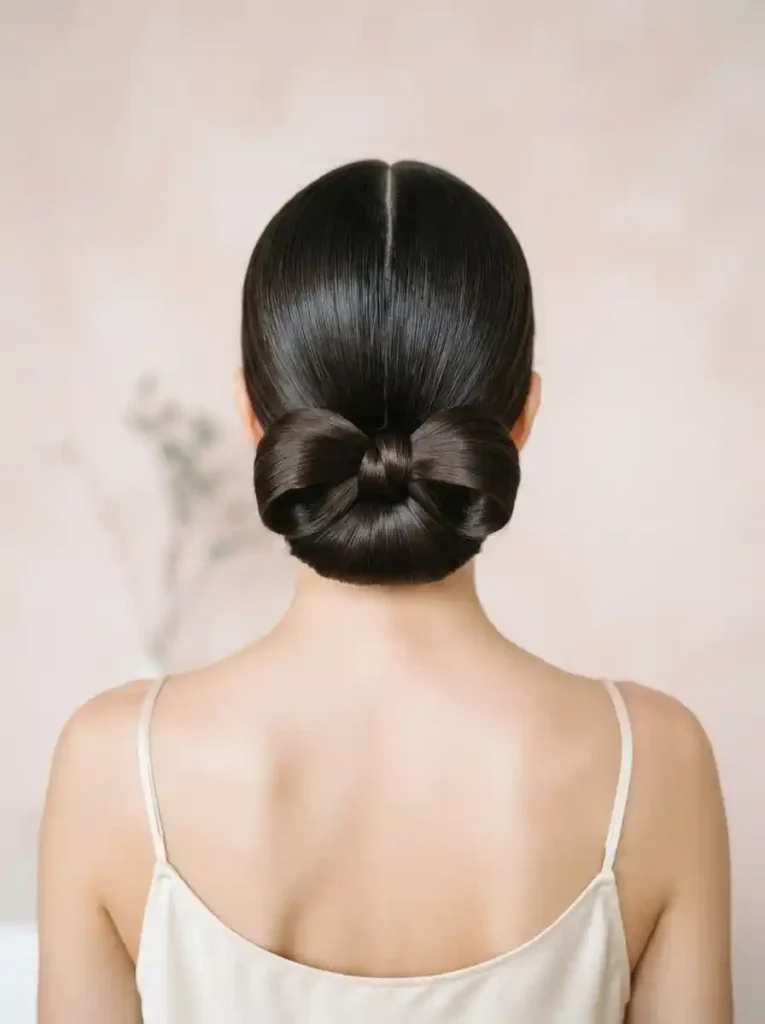
- Uses folded hair sections to create a soft bow-inspired silhouette.
- Adds a playful detail without relying on a separate bow accessory.
- Looks especially defined on long, smooth hair.
- Balanced loops make the shape appear neat from the back.
Create a playful yet polished silhouette with a bow loop bun made entirely from your own hair. Begin with a low ponytail, reserve a small center section, and divide the remaining length into two equal portions. Fold each portion into a rounded loop and secure them on either side, then wrap the reserved section across the middle to create a defined center. Long, smooth hair makes the bow shape especially clear. I’ve noticed that keeping both loops similar in size is the key to making this hairstyle look intentional rather than uneven or overly bulky.
This bow-inspired bun works particularly well when you want your hairstyle to become a memorable detail without using a large accessory. It can suit parties, birthdays, festive gatherings, creative portraits, or a fun polished outfit. Keep the crown sleek if you want a modern finish, or soften the front with subtle face-framing strands for a more relaxed appearance. A lightweight styling cream can help smooth the loops before pinning them. Once secured, gently widen each loop with your fingertips until the shape looks balanced, then use flexible hairspray to help the bow retain its structure throughout the occasion.
13. Crisscross Bun
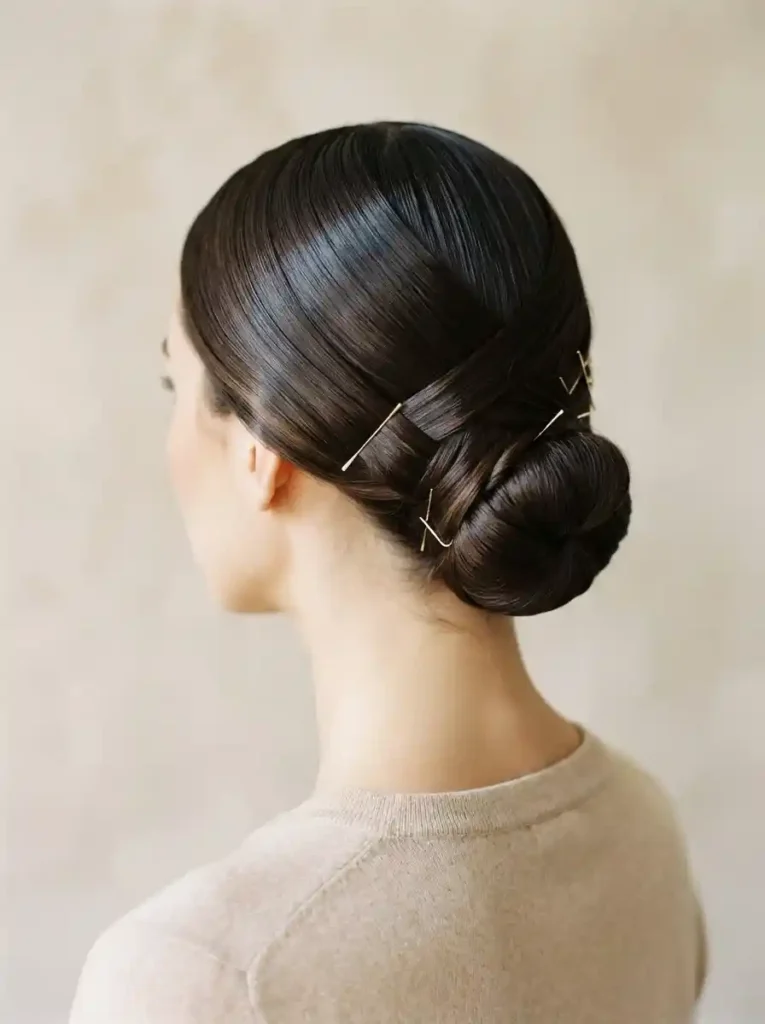
- Creates a striking woven effect across the bun.
- Gives long hair a more intricate appearance without braiding.
- Works especially well with smooth, manageable lengths.
- Hidden pins help keep the crossed sections secure.
Make a simple updo look intricately styled with a crisscross bun that uses overlapping sections to create a woven appearance. Gather the hair into a low ponytail, divide the length into several manageable pieces, and cross them diagonally over the bun base in alternating directions. Secure each section underneath with discreet pins so the surface stays smooth. This design is easiest with medium-to-long hair that has enough length for overlapping layers. In my experience, working with thinner sections gives the crossed pattern more definition and prevents the finished bun from looking too heavy.
The crisscross detail makes this style particularly useful when you want an updo that photographs beautifully from behind. It can work for formal gatherings, dinners, celebrations, or occasions where you want something more distinctive than a regular low bun. Keep the front sleek for a sophisticated appearance, or loosen a few strands around the face for a softer effect. If your hair is slippery, lightly texturize the lengths before arranging the sections. Once everything is pinned, gently check the crossing points and adjust them so the pattern looks even, clean, and deliberate from different angles.
14. Half-Twist Bun
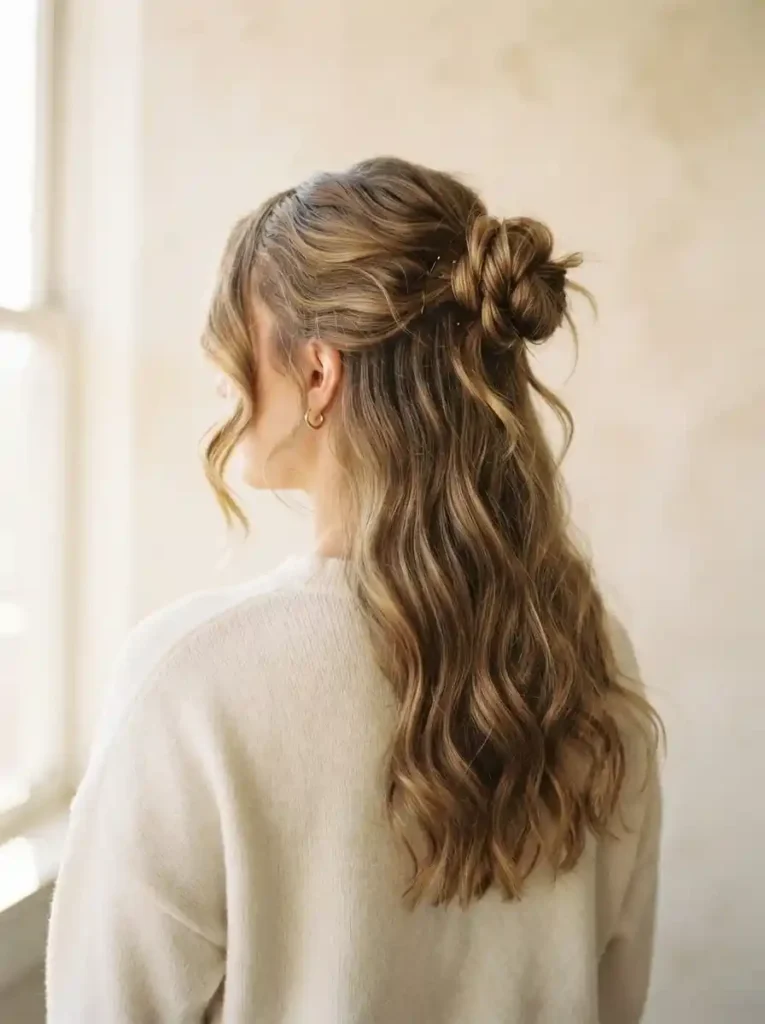
- Combines an open lower section with a controlled twisted bun.
- Keeps the hairstyle relaxed while still looking finished.
- Works nicely with naturally wavy or textured hair.
- Leaves visible movement through the lower lengths..
Keep some movement flowing while adding structure with a half-twist bun that combines an updo with loose lower lengths. Gather only the upper portion of medium-to-long hair, twist it gently into a compact bun, and leave the remaining hair down. This creates a lighter silhouette than a full updo and works beautifully with naturally wavy or softly curled textures. If your hair is straight, adding loose waves beforehand can give the lower section more movement. I’ve noticed that keeping the twist slightly relaxed helps the transition between the bun and loose hair look natural.
This hybrid style is ideal for days when you want your hair partly secured without committing to a completely pinned-up look. It can suit casual lunches, family gatherings, school functions, weekend plans, or relaxed celebrations. The loose lower section keeps the hairstyle approachable, while the twisted bun adds enough structure to make it feel intentional. Use a small elastic beneath the bun before adding pins for extra stability. For a Pinterest-friendly finish, gently pull the crown upward for subtle volume and allow a few naturally textured pieces to remain visible around the face.
15. Pearl Pin Bun
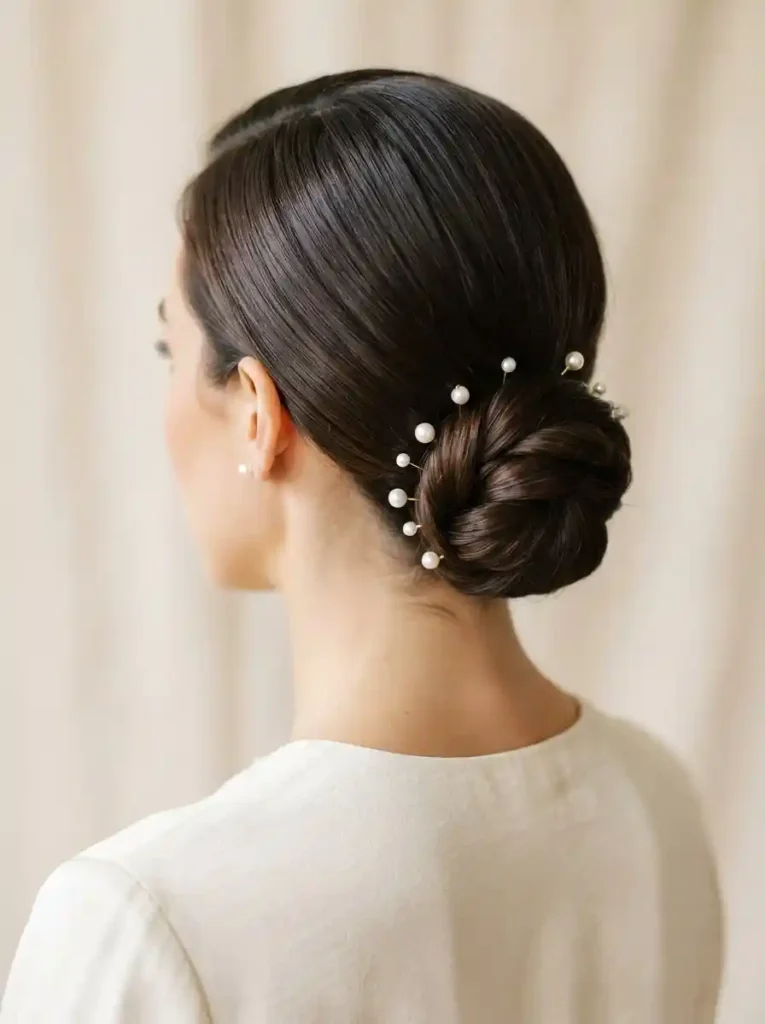
- Lets delicate pins become the main decorative detail.
- Keeps the underlying bun simple and easy to manage.
- Pearl accents work especially well against darker hair.
- Pin placement can be customized for subtle or stronger impact.
Add a refined finishing detail to a simple updo with a pearl pin bun that lets delicate accessories create the visual interest. Form a smooth low or medium bun using a simple twist, then place several small pearl pins around one side rather than covering the entire hairstyle. The contrast is especially noticeable against brunette or deep-toned hair, while lighter hair creates a softer effect. Choose lightweight pins with secure grips so they stay comfortable. That’s why many hairstylists recommend distributing decorative pins instead of clustering them in one heavy area, which helps the bun remain balanced.
A pearl-accented bun can easily transition from understated daytime styling to more polished event hair. Use only two or three pins for a minimalist appearance, or arrange several in a curved line when you want stronger visual impact. This design works nicely for celebrations, dinners, formal school events, family occasions, and photographs. Keep the rest of the hairstyle uncomplicated so the pearls remain noticeable. If your hair is fine, gently add texture before creating the bun to improve grip. Finish with flexible hairspray, then check that every pin feels secure and does not pull uncomfortably.
16. Rope Twist Bun
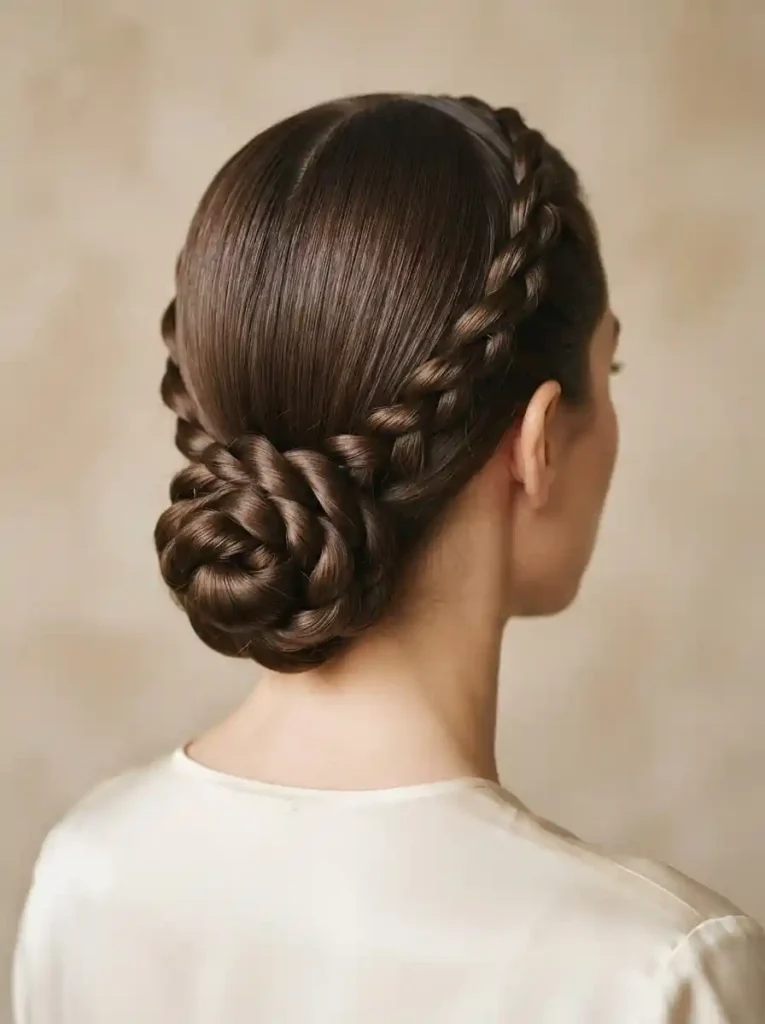
- Creates a clean, rope-like texture around the bun.
- Works especially well with long, smooth hair.
- The twisted pattern adds detail without needing braids.
- A slightly loose finish gives the rope texture more dimension.
Give your updo a defined texture with a rope twist bun that looks intricate without requiring traditional braiding. Divide a secure ponytail into two sections, twist each section in the same direction, then wrap them together in the opposite direction to create a firm rope effect. Coil the finished twist around the base and secure it underneath. This technique works especially well with long, smooth hair because the pattern stays visible. In my experience, keeping the twists consistent from roots to ends creates a cleaner finish and helps the bun maintain its rounded shape throughout the day.
A rope-textured bun is a practical option when you want an elegant hairstyle with noticeable detail but minimal accessories. It works beautifully for dinners, celebrations, presentations, formal gatherings, or polished everyday outfits. The twisting technique also helps keep longer hair contained, making it useful when you want your style to stay neat for several hours. For softer movement, loosen the crown slightly before finishing the bun. If your hair has layers, secure the wrapped sections with several small pins rather than one large pin. This distributes the weight and helps the rope pattern stay intact without feeling overly tight.
17. Knotted Side Bun
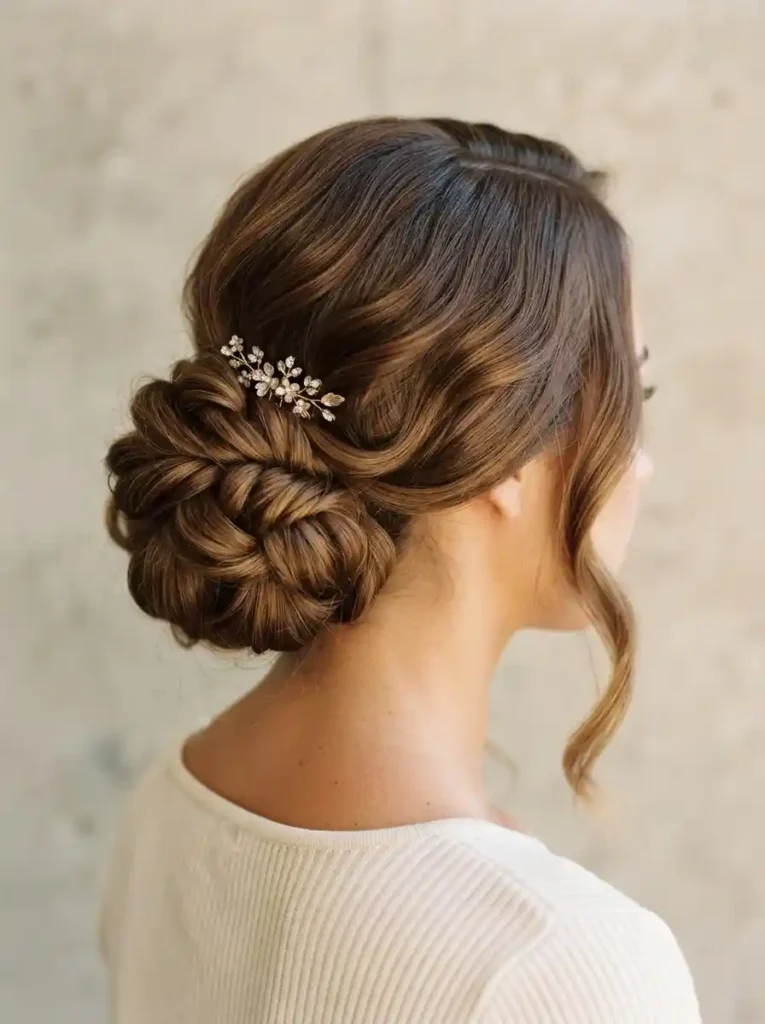
- Creates an asymmetrical shape with visible knotting detail.
- Gives a classic updo a more modern silhouette.
- Works well with medium-to-long textured hair.
- Face-framing strands can soften the stronger side placement.
Move your bun to the side for a modern shape with a knotted side bun that combines softness and structure. Create a deep side part, sweep the hair toward the preferred side, and divide the gathered length into sections before tying gentle knots and layering them into a compact bun. This design works especially well with medium-to-long wavy hair because natural texture gives the knots extra dimension. Keep the front smooth while allowing a few soft strands near the face. I’ve noticed that slightly relaxed knots look more natural and prevent the hairstyle from appearing too rigid or overly constructed.
The side placement makes this bun especially useful when you want your hairstyle to complement an asymmetrical neckline or statement earring. It suits dinners, celebrations, family events, photographs, and polished evening outfits. If your hair is naturally straight, create loose waves before knotting to improve grip and visual fullness. Use small pins beneath each knot so the structure remains secure without showing the hardware. A light mist of flexible hairspray can control flyaways while preserving movement. Before finishing, view the bun from the front and side to make sure its position balances the overall hairstyle.
18. Fishtail Bun
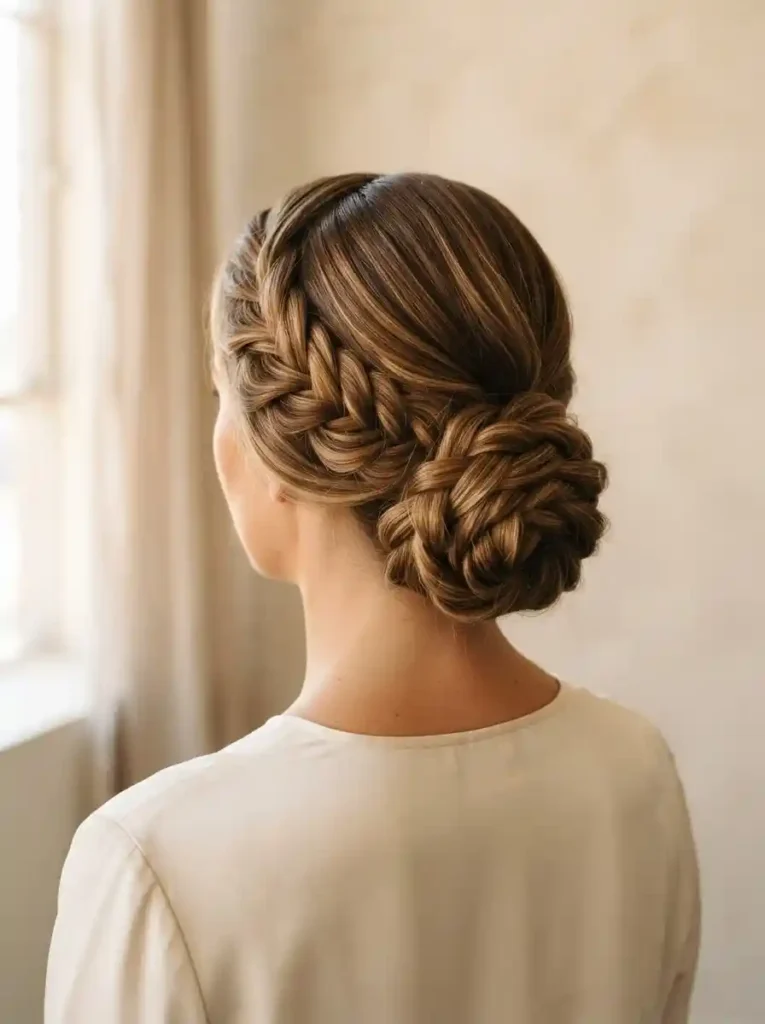
- Adds intricate texture through a compact fishtail braid.
- Creates a detailed look while keeping the hair secured.
- Works beautifully with highlighted or dimensional hair color.
- Loosening the braid slightly makes the bun appear fuller.
Add intricate texture to your updo with a fishtail bun that turns a detailed braid into a compact, wearable shape. Start with a low ponytail, create a fishtail braid through the length, and wrap it around the base before securing the end underneath. The smaller overlapping sections make the braid visually rich, especially when hair has subtle highlights or multiple natural tones. Medium-to-long hair provides enough length for a substantial braid. I’ve seen this style work beautifully for many people because gently loosening the braid creates fullness while preserving the recognizable fishtail pattern.
This braided bun is a strong choice when you want an elegant hairstyle that looks detailed from the back but remains practical for longer wear. It can suit celebrations, formal dinners, school events, family gatherings, or photographs where texture adds extra visual interest. Keep the crown sleek for a refined appearance, or gently lift it for softer volume. If your hair is layered, secure the braid at several points after wrapping so shorter pieces stay contained. A flexible finishing spray can help maintain definition without making the braid feel hard, allowing the hairstyle to retain a natural, touchable finish.
19. Infinity Loop Bun
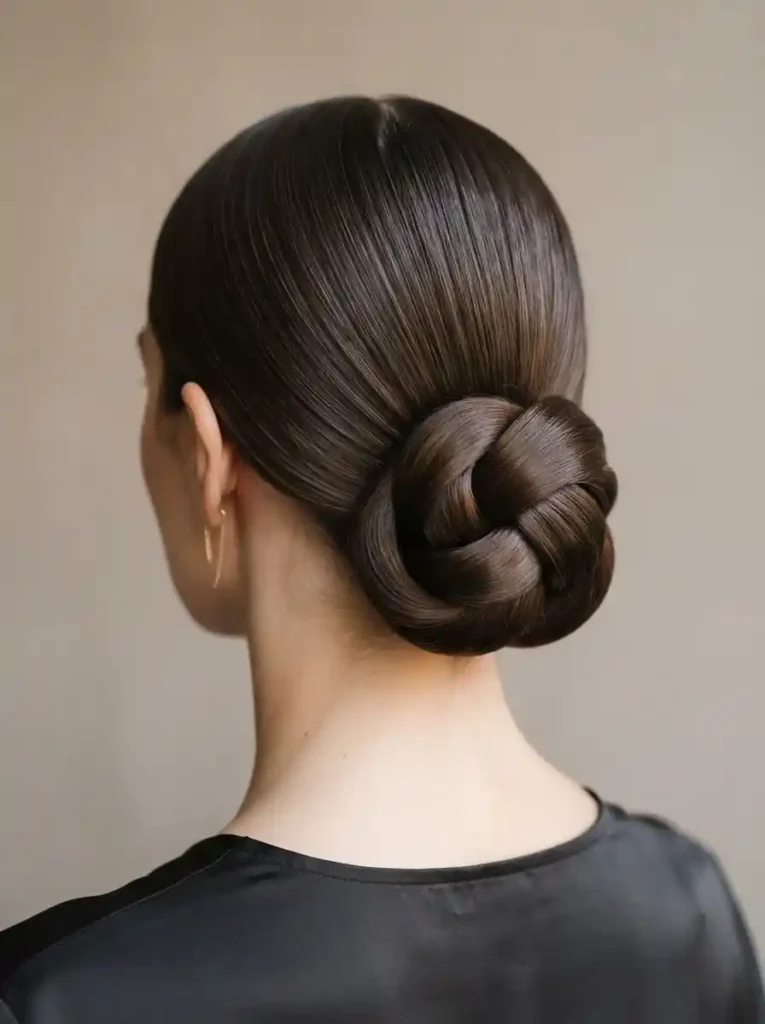
- Creates an elegant figure-eight shape with overlapping sections.
- Adds movement and dimension without complicated accessories.
- Works especially well on long, smooth hair.
- Strategic pinning keeps the loops defined throughout the day.
Give your updo a distinctive silhouette with an infinity loop bun shaped around an elegant figure-eight pattern. Gather long hair into a low ponytail, divide the length into two sections, and create overlapping loops before wrapping the remaining ends underneath. Secure each crossing point with discreet pins so the design stays defined. Smooth, straight hair makes the pattern especially visible, while softly waved hair creates a more relaxed interpretation. In my experience, building the loops gradually rather than pulling everything tightly gives the finished bun more dimension and makes the figure-eight shape easier to recognize.
The infinity-inspired structure is perfect when you want an updo that feels sophisticated but noticeably different from traditional buns. It can work for formal dinners, celebrations, photographs, or polished occasions where the back of your hairstyle deserves attention. Keep the front simple with a center or side part so the sculptural bun remains the focal point. If your hair is very fine, gently texturize the lengths before forming the loops to improve grip. Once pinned, check the crossing section from behind and adjust the loops until they appear balanced, then finish with flexible hairspray for lasting control.
20. Twisted Halo Bun
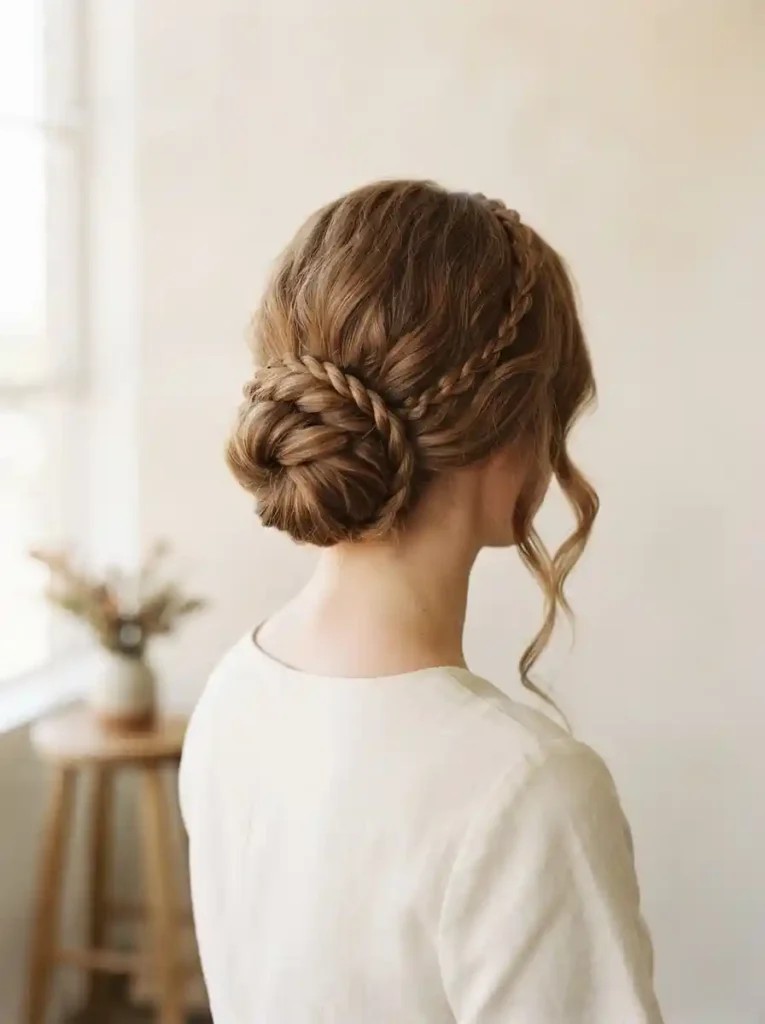
- Creates a circular twisted detail around the bun.
- Gives the hairstyle a soft, dimensional outline.
- Works nicely with long wavy or straight hair.
- A thin twisted section can create the halo without excessive bulk.
Frame your updo with a twisted halo bun that places a delicate circular detail around the main shape. Create a low rounded bun from most of the hair, then reserve a narrow section near the front or side. Twist that section gently and guide it around the bun like a halo before securing it underneath. This technique works especially well with long hair because there is enough length to create a complete circle. I’ve noticed that keeping the halo narrow makes the hairstyle look more refined, while a slightly loosened twist adds texture without competing with the central bun.
The halo effect gives this bun a graceful finish that works for celebrations, dinners, formal gatherings, photographs, and special occasions. It can also soften a sleek outfit by introducing gentle texture around the back of the hairstyle. For a relaxed interpretation, leave a few fine strands around the temples and avoid making the bun perfectly symmetrical. If your hair is slippery, add a small amount of texturizing product before twisting the halo section. Pin the ends underneath the bun, then lightly adjust the circular shape so it sits evenly around the base without pulling the surrounding hair.
21. Pearl-Thread Bun
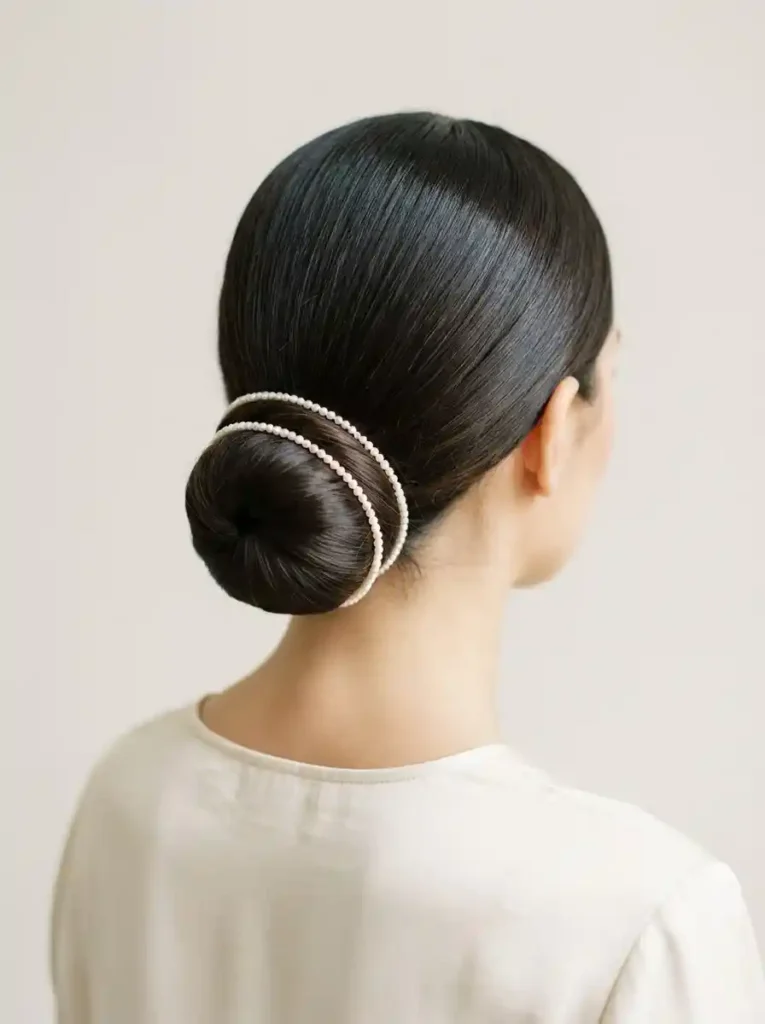
- Blends a simple bun with a delicate strand of pearl detailing.
- Creates a refined look without complicated styling techniques.
- Works especially well with smooth, controlled hair.
- The pearl strand can follow the bun’s natural curve.
Elevate a simple updo with a pearl-thread bun that follows the natural curve of the hairstyle instead of covering it. Create a smooth low bun using a basic twist, then gently wrap a thin strand of small pearls around the outer edge and secure it discreetly underneath. The decoration works particularly well against darker hair because the pearls remain clearly visible. Keep the bun compact so the accessory follows its shape neatly. That’s why many hairstylists recommend using lightweight decorative strands, which add visual detail without creating unnecessary weight or making the bun difficult to wear.
This elegant variation is ideal for celebrations, formal dinners, graduation events, family occasions, or photographs where a subtle accessory can make the hairstyle feel more finished. Unlike a large decorative clip, the pearl strand becomes part of the bun’s structure and creates a delicate curved detail from the back. Keep the front sleek for a sophisticated appearance, or add soft face-framing strands for a gentler finish. If the pearls shift easily, place a few discreet pins underneath the bun to anchor the strand. Finish with flexible hairspray around the surrounding hair for a clean, polished result.
22. Braided Loop Bun
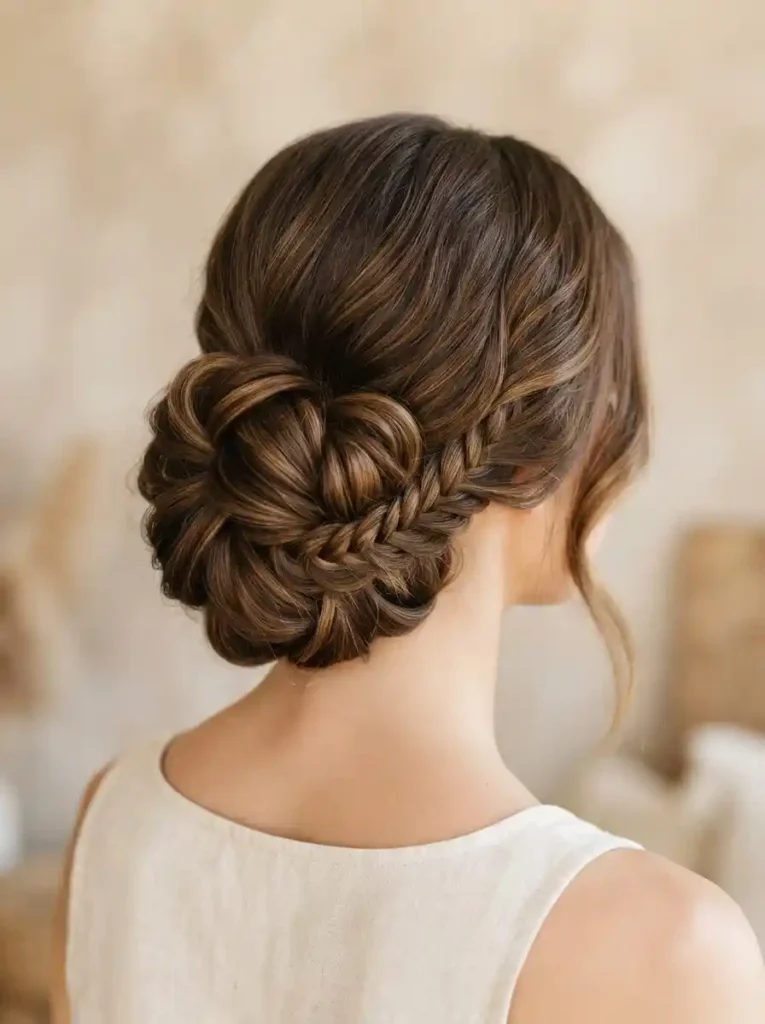
- Combines looping sections with a visible braid for extra texture.
- Creates a dimensional shape that looks detailed from behind.
- Works especially well with long, manageable hair.
- Small hidden pins help preserve the loops without flattening them.
A braided loop bun gives a classic updo a creative finish by combining soft loops with visible braided texture. Start by gathering long hair into a low ponytail, then separate a small section for a braid and divide the remaining hair into two or three sections. Create rounded loops from those sections and secure them around the base, then wrap the braid through or around the loops. This technique works especially well with slightly textured hair because the loops hold their shape more easily. I’ve noticed that gently loosening each loop creates a fuller appearance while keeping the braided detail clearly visible.
This hairstyle is a lovely choice when you want something polished enough for celebrations but more distinctive than a traditional bun. The combination of rounded loops and braid creates depth, making the back view especially attractive for photographs and Pinterest inspiration. It works well for weddings, family gatherings, formal dinners, school events, or special occasions. For a softer finish, leave a few fine strands around the face and avoid pulling the crown too tightly. Secure each loop underneath with discreet bobby pins, then use flexible hairspray to control flyaways without making the finished hairstyle look stiff.
Conclusion: Bun Hairstyle Ideas for Women
The right bun can turn a simple hair day into a polished, creative, and memorable look. These Bun Hairstyle ideas for women offer plenty of ways to experiment with texture, placement, braids, twists, loops, and delicate accessories without making every style feel complicated. I’ve seen how one small change, such as moving a bun to the side or adding texture, can completely refresh an outfit.
Save this article to your Pinterest boards so you always have fresh inspiration ready. Try one style this week, experiment with another for a special occasion, and share these ideas with someone who loves discovering beautiful new hairstyles. Your next favorite updo could be here!
![24_Wedding_Guest_Hairstyles_You’ll_Love_for_Any_Dress[1]](https://styledaura.com/wp-content/uploads/2026/09/24_Wedding_Guest_Hairstyles_Youll_Love_for_Any_Dress1-768x432.webp)